How to install a split system air conditioner?
Step by step explanation of the split system air conditioner installation. Learn about process and why you shouldn’t do this yourself. Read more.

First of all – don’t. More precisely, you should never install your air conditioner yourself and that always has to be done by professionals. Air conditioner installation should be done by a certified air conditioning installer. They need to have a licence issued by the Australian Refrigeration Council.
How to Install a Split System Air Conditioner?
Step 1: Unpack the Units and Set Aside the Indoor and the Outdoor Units
Step 2: Find a Good Place for the Indoor Unit
Step 3: Install the Pipes and Wires
Step 4: Install the Indoor Unit
Step 5: Connect the Pipes and the Power Supply
Step 6: Position the Outdoor Unit
Step 7: Connect the Outdoor and the Indoor Unit
Step 8: Use the Vacuum Pump for Refrigerant Circuit
Step 9: Finish Up the Wall and the Pipes
Step 1: Unpack the Units and Set Aside the Indoor and the Outdoor Units

Image source: Brisbane Power Electricians
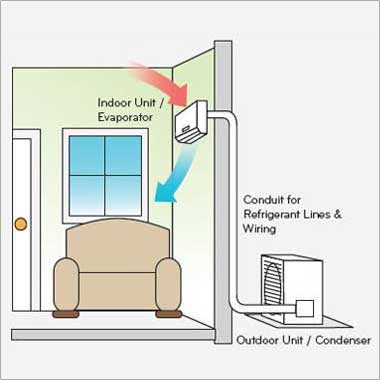
If you are interested in how the entire process goes, you first need to understand that there are two units in a split system air conditioner. The outside unit is the one in which you will find the compressor and the condenser, while the inside unit contains the evaporator coils and the fans.
Both parts need to be connected with pipes and wires. These are necessary for the power supply and for the pipes that distribute hot and cold air.
Step 2: Find a Good Place for the Indoor Unit
Your indoor unit needs to be raised to at least 2 m in height and it should be surrounded by a free wall in a radius of 15 cm in all directions. Find a place that is away from any heat sources, antennas and similar devices. Ideally, your inside unit of the air con will be the only item on your wall.
Step 3: Install the Pipes and Wires
The first thing to install is a metal plate to which the unit will be attached. Drill the hole through the wall. It should be at least 7.5 cm in diameter, and it should be sloping downwards to ensure natural drainage fall. Put through the pipes and the cables so you can continue working on the indoor unit.
Step 4: Install the Indoor Unit
When installing the indoor unit, you will have to remove the casing and attach the device to the metal holder. Then, you have to level it to make sure it will have proper drainage.
Once the unit is attached, remove the filters from the cover and reattach the cover to the unit. Filters come in last before the final front cover attachment.
Step 5: Connect the Pipes and the Power Supply
You need to connect all the necessary pipes and wires to the indoor unit and make sure they are protected in the outside environment. The air conditioning installer will already know how to do it, but if they are not sure, they will do their installation together with an electrician who will review the work done on the wiring.
Step 6: Position the Outdoor Unit
This unit can be mounted on a wall or placed on the ground. Either way, it needs a base, and it needs to have free space around itself in 30 cm diameter. Of course, it should not be near any heat sources, excessive dirt or mud that could clog the filters and such.
Step 7: Connect the Outdoor and the Indoor Unit
Remove the cover and connect all the wiring and the pipes according to the manufacturer’s manual. It is essential that everything is done in accordance with the schematics. Don’t improvise because the results can be catastrophic.
Step 8: Use the Vacuum Pump for Refrigerant Circuit
There should be no air and no humidity whatsoever in your refrigerant circuit. You need to use the vacuum pipe to remove all of it. Even when you are installing a brand new air-con, the vacuum step needs to be done. It is essential for the proper functioning of your air-con.
Step 9: Finish Up the Wall and the Pipes
Once the functionality has been taken care of and everything is nice and checked, you need to deal with the visual component of your air conditioning installation. Seal the hole in the wall and paint over the edges; make sure the pipes and plumbing are covered and have their own protective covers. In other words, deal with the details.
Take a look at all this done by a professional air conditioner installer:
Why Are Air Conditioners Placed at the Top of the Room?
The cold air is denser and, therefore, heavier. Air conditioners are placed at the top of the room so that the cold air would naturally fall downward and spread evenly throughout the entire room.
If the air conditioning installation is done so that your air con is on the floor, the hot air would still be up, and the cold air would have to build up from the floor up. It would not be economical or fast. This is the principle of convection.
How Much Does It Cost to Install a Split System Air Conditioner?
We already established the fact that you should never do your own air conditioning installation. This means that you need a licenced expert to do your air conditioning installation. This, of course, comes with a price. There is a range of pricing per hour throughout Australia. Air conditioning installation can cost from $60 to $88 per hour.
You need to add the price of the air conditioning system you are purchasing to this hourly rate. Since the split system air con installation can last several hours, be sure that you have the money to make it happen. There is a way to get a much better and more precise idea about how much air con installation will cost you.
Ask for quotes from air conditioning experts. At Service Seeking, you can contact as many air conditioning installers as you want and discuss the specifics of your home. They will send you their estimates for the job, and you can choose from the best among the best.
